Hardware vs software tilt-shift
Software tilt-shift seems like the easiest way to create the miniature effect on astrophotos, with ready to use digital filter that can be used on any astrophoto. But, software tilt-shift effect give somehow the weird effects, like having the stars disappear farther from the object, which (to me) totally ruins the closeness impression. This is because of the preliminary enhancement applied to the image, which in all the case reduces the actual strength of the surrounding stars (via actual saturation of the sensor by the focused stars as well as non-linear stretching of the histograms). Also, the defocused stars lose their colors as they are saturated on the sensor, giving only white stars. These effects can be seen easily by applying available digital tilt-shift filters to your astrophotos.
The hardware tilt-shift naturally avoid these effects, as the defocused stars are not saturated on the sensor, keeping their color, and brightness. The difference between hardware and software tilt-shift effect is, to me, the same as between a portrait taken with a fast lens with a real bokeh, and a background blur filter (like the one you might have on your smartphone camera): although they can look similar a first glance, the software filter is just a pale imitation of the actual effect obtained with hardware tilt-shift, especially for astrophotos (software tilt shift can be doing very well with images with small dynamic range for miniature faking). I had already this point in mind before doing the image, and this is what pushed me to try hardware tilt-shift, to see what the effect would be on the image by doing it for real.

Why trying it (or not) ?
Trying hardware tilt-shift depends on your goal. If you want your pictures to reveal the smallest details of a galaxy, or are looking for the outer extensions of nebulas, it is not for you, and you might just stop reading here. If you want to experiment, and are not really motivated in spending time redoing what other people have been doing countless times, it is definitely opens possibilities that have not been explored. Personally, this is just my case, I have tens and tens of gigabytes of unprocessed, regular acquisition on my hard drives, which I will never process as I know they will just be giving the usual, expected results. I have much more motivation for working on specific objectives, for which no equivalent exist than to redo what has been done thousands of times by others. If you want to try, below are some advises from my (limited) experience on hardware tilt-shift astrophotography.
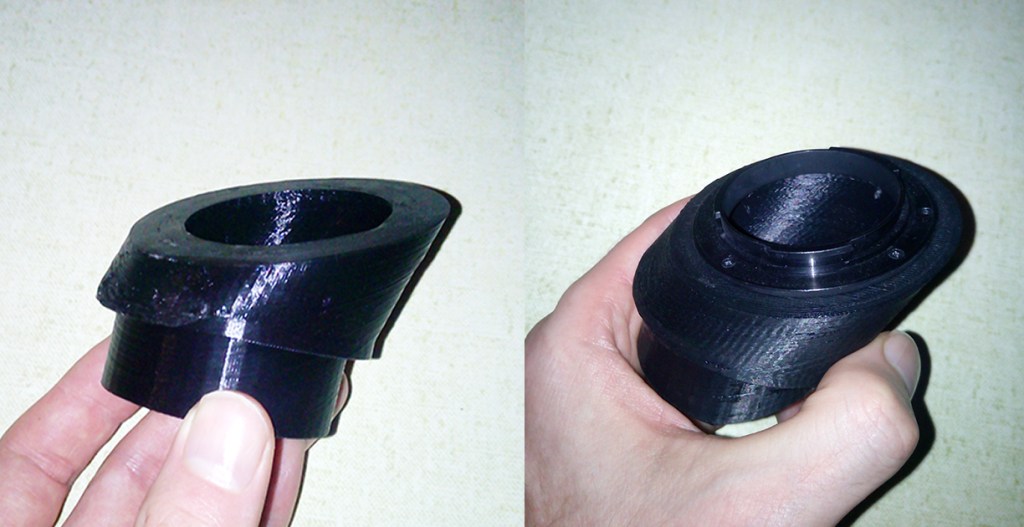
The tilt-shift adapter:
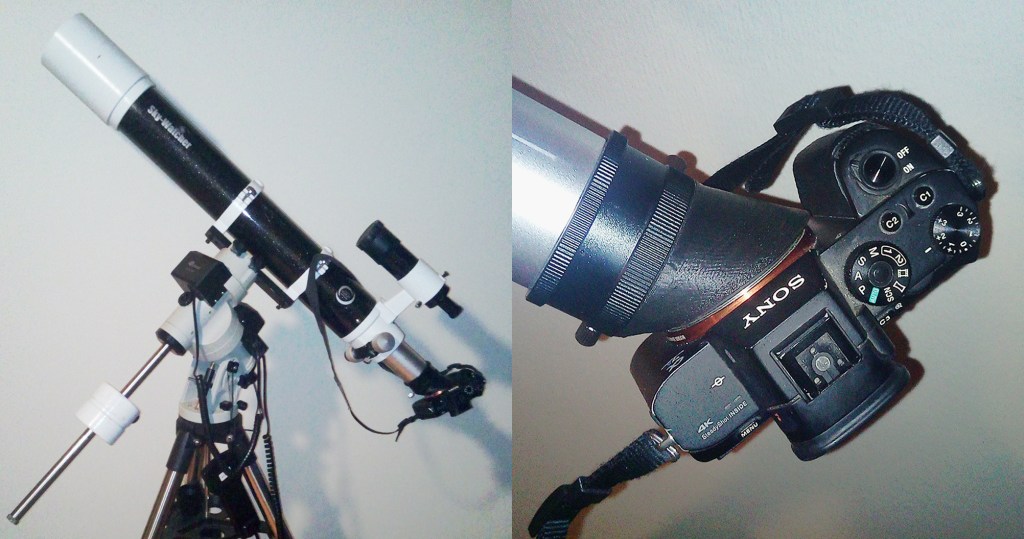
The adapter is 3D printed. I made it for my DSLR, a Sony A7s. Here is a link to download the STL file i used for you to get 3D printed. The STL file fits a 2″ diameter focuser. A DSLR bayonet must be attached to the flat, tilted surface. I used the bayonet of a cheap extension ring for Sony E mount. I used a hot needle to pierce small holes for the minute screws of the bayonet. The 3D printing material was soft enough so that I did not need to tap the holes, I just screwed the minute fixations screws in needle holes of the printed part.
Issues and limitations:
The refractor used being f/9, large tilt is needed to obtain a decent blur at the edge of the sensor. I ended up with 25° tilt in order to get a satisfying size for the defocused stars. This is very large angle compared to the tilt-shift adapter you can buy for your camera lenses. With such a large angle, some issues arise:
- The main issue for me was the small bayonet diameter of E-mount, which blocks some part of the beam before it reaches the sensor. This extra-vignetting of the “front” edge of the sensor significantly reduces the imaging area of the sensor. For this, the best is if you have a sensor with large mount, and small flange focal distance. DSLR like for instance the Nikon Z mirrorless cameras would allow for larger tilt without this extra-vignetting.
- The large angle of incidence of the rays on the sensor, equivalent to the marginal rays of a lens of f/1, seems to create a lower efficiency of the sensor, and possibly alter a bit color rendition. I suspect some crosstalk between pixels and shadowing effect of the wiring circuits of the pixels on the sensitive area. Yet, I did not do any accurate comparison, but it seemed not the same as what I am used to.
- The image is notably stretched on the sensor, which is easy to compensate in post processing by rescaling (but you should not forget to do it).
Framing and mosaic
The image is a 2-tile mosaic. The total exposure of the image is 2h30, in with individual frames being 30s exposure. In order to maximize the closeness impression (amount of blur), the blur variation is along the long axis of the sensor. Obviously, it is important to make the galaxy long axis roughly parallel to the focused direction so that the galaxy appears relatively sharp on the image in order to get the closeness impression.
The point of focus was made on the Andromeda galaxy nucleus on each frame. It is important that the nucleus of the galaxy is located approximately at the same height on the sensor on both frames so that the tilt-shift defocus is consistent between the two frames. For tilt-shift images, the quality of the polar alignment is very important in order to avoid any drift of the image during the acquisition. This is because the focus is only good on small area of the sensor, so the galaxy center must remain in this area all along the acquisition.

Post-processing
Post-processing of the image is also a bit different from usual imaging. Most of the standard registration software are based on star detection. Here, they do not work well at all because most of the stars are quite defocused. To register the images, I used the simplest alignment, only translation to cope with this issue. Hence the overall quality of the registration is not as good as one can get with standard imaging.
I did not manage to get pleasing results with the usual feature enhancements strategies. The main reason is that, contrary to usual where the stars are all the smallest features of the image, here the stars have a whole range of size. Detail enhancement lead to weird edge effects on the defocused stars, which I guess can be limited using mask, but for the consistency of the whole image, I preferred not to push the usual processing and to keep a more natural aspect, closer to the view one can have of the galaxy using a low magnification scope or large binoculars. The second reason of not pushing the processing more was that, with the limited total exposure under not very dark sky, the noise quickly increased.
Possible improvements:
Here is some possible improvement if you want to experiment tilt-shift technique, starting with the most important points.
- Expose more! Better image can definitely be obtained with this technique, with more details and contrasts in the galaxy. Yet, I think you should not expect to be able to obtain the same kind of results as with regular astrophotos because of the actual blur on the image clearly limits the details ! On my side, if I had known that the image would get such visibility (I was definitely not expecting to be the overall winner!), I would definitely have spent a couple of nights in a dark sky to get higher quality data, and get better details and contrasts in the galaxy and its outer disk !! But as you may guess, with design and trials of different 3D printed parts, and tests on the telescope, this project lasted obviously much longer for me than the exposures making the final image, and with the constraints of getting good weather during autumn in northern France, moon interference, work, etc. it is not that easy to find a slot for imaging.
- Use of an astrophotography camera: DSLR, with their color filter arrays, microlenses, pixel circuit wiring, have a pretty complex pixel architecture, that I think does not accommodate very well with large tilt angle. Dedicated astronomy cameras have a simpler architecture (not color filters for monochrome cameras, no microlenses for back-illuminated sensor, etc), that I think would be more appropriate to accommodate large tilt angles.
- Use of a faster refractor: with a faster refractor, the tilt angle needed is lower, reducing the issues linked to the angle of incidence of the rays. It would also definitely allow to get deeper, better looking image.
- Use of a field-corrected telescope: this is a small detail, but one may see that the stars in the upper part of the image are slightly horizontally elongated, while the ones in the lower part of the image are vertically elongated. This is due to the astigmatism of the refractor used without field corrector, with separated tangential and sagittal focusing surfaces. This can be removed using a field corrector correcting for both the field curvature and astigmatism of the image, so that the bokeh is more homogeneous over the whole field of view of the image.
